How to install Windows 11 on PC that doesn't meet system requirements: Instructions
 How to install Windows 11 on an unsupported PC (photo: Unsplash)
Windows 11 has strict system requirements that prevent many users from officially installing the new OS. However, there are several proven ways to get around these restrictions and run Windows 11 even on old or unsupported PCs, reports Lifehacker.
Risks of installing Windows 11 on an unsupported PC
It's worth noting right off the bat that it's a bad idea to install Windows 11 on very weak PCs. Microsoft requires a minimum of 4 GB of RAM and 64 GB of free space to install Windows 11.
If your computer doesn't meet these requirements, it's best not to upgrade. This guide is primarily intended for owners of powerful PCs that can't upgrade to Windows 11 due to TPM-related restrictions.
The main reason Microsoft insists on having TPM 2.0 is security. PCs with the TPM module are better protected from malware and ransomware attacks, and can more securely store sensitive data locally.
Although this setting can be bypassed, Microsoft warns that installing Windows 11 on an unsupported computer may result in compatibility issues, performance degradation, and a lack of official support. In addition, any possible damage to the device will not be covered by the warranty.
If your PC is still under warranty, it is not recommended to change its configuration. However, if your warranty has already expired, you should consider upgrading to Windows 11, as Microsoft has announced that free security updates for Windows 10 will end on October 14, 2025.
What happens after the latest Windows 10 security update
After the release of the latest security update, it is strongly recommended that you do not access the Internet with a PC running Windows 10. Without new patches, the system will be vulnerable to modern viruses, malware, and other threats.
Microsoft offers paid updates under the Extended Security Updates (ESU) program, but it is quite expensive. In the first year, the cost is $61 per device and then doubles every year. For educational institutions, the price is lower - $1 per device in the first year, increasing to $4 by the third year.
However, if you have a Windows 10 license, upgrading to Windows 11 is free and includes free security updates for years to come.
How to upgrade an unsupported PC to Windows 11
Before you start the upgrade, be sure to back up your data. This will help you avoid losing important files such as photos, videos, and documents.
Downloading Windows 11 ISO
- Go to the official Microsoft website and find the Download Windows 11 Disk Image (ISO) for x64 devices section
- In the drop-down list, select the latest version of Windows 11 and click Download Now
- After the link appears, click 64-bit Download - the file size exceeds 6 GB, so it will take some time to download
Prepare a bootable USB flash drive
- Download Rufus, a free program for creating bootable USB flash drives. Use only the latest version, as Microsoft periodically blocks TPM checks from being bypassed.
- Prepare a USB drive with a capacity of at least 8 GB. Copy all important data from it, as it will be deleted when creating the bootable media
- Connect the flash drive and launch Rufus
- In the program, select your USB drive in the Device field
- Press SELECT and specify the downloaded Windows 11 ISO file
- Click START, and a window with additional installation settings will appear
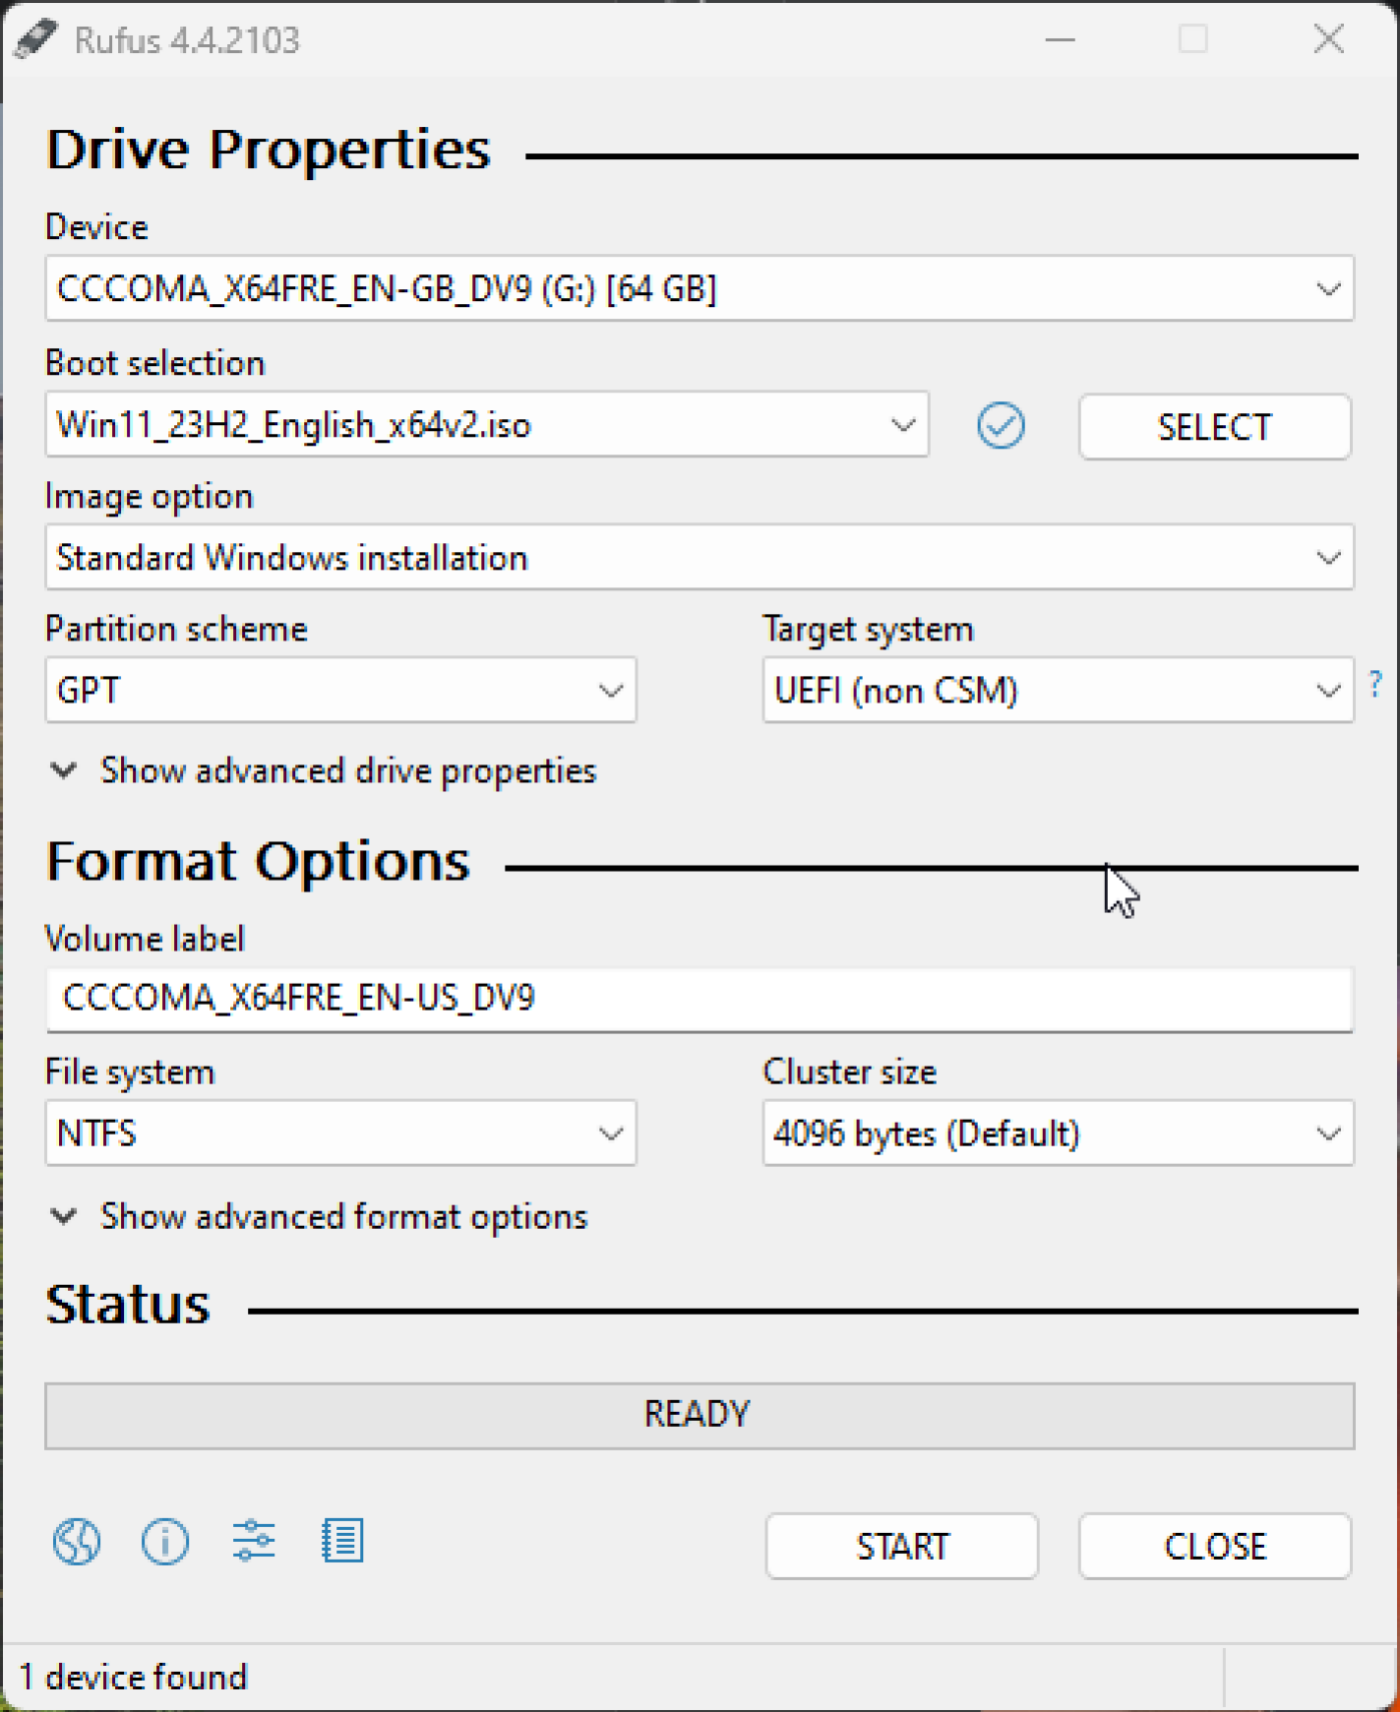
Rufus (photo: Lifehacker)
Set up Windows 11 installation
When prompted, select the following options:
- Disable 4 GB RAM, Secure Boot, and TPM 2.0 requirements
- Disable the requirement for an online Microsoft account
- Create a local account
- Disable data collection (skip the privacy questions)
The first option is required to install Windows 11 on unsupported PCs. The rest of the options will help you avoid the need to sign in to your Microsoft account and remove unnecessary privacy questions. After selecting all the options, click OK and wait for the process to complete.
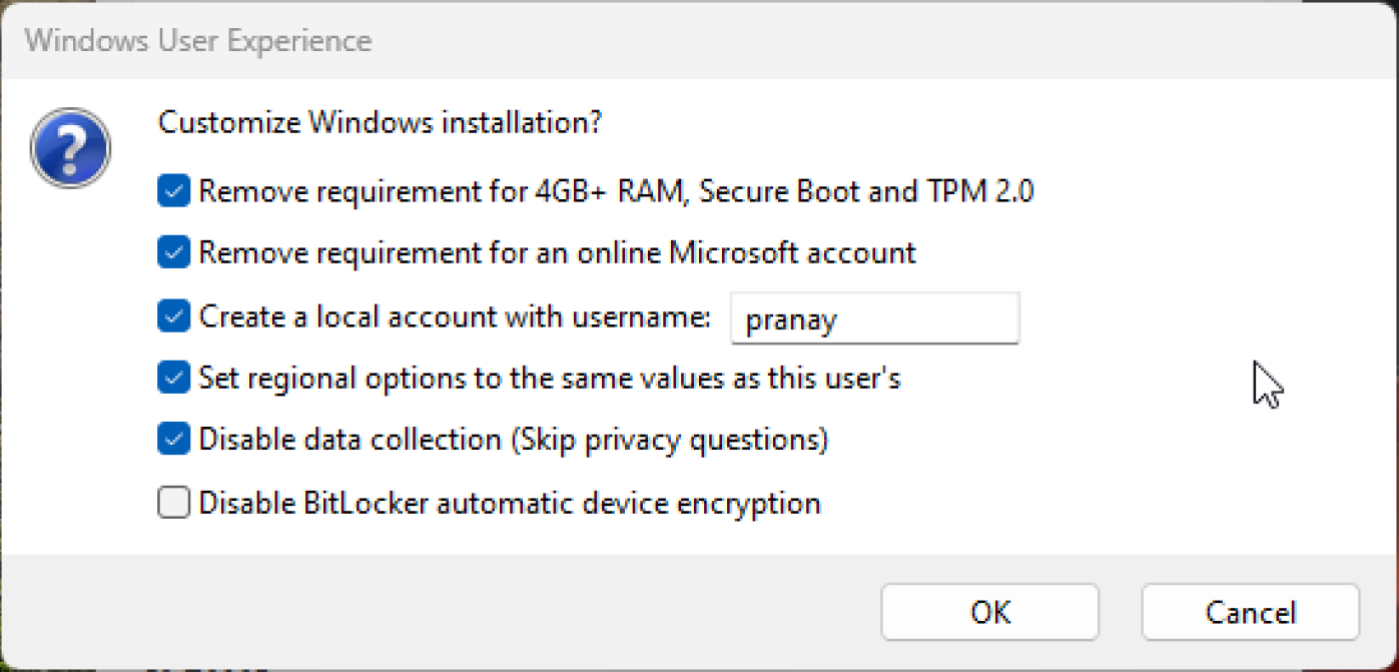
Setting up Windows 11 installation (photo: Lifehacker)
Installing Windows 11
Before installing, make sure that your data is saved once again. You now have two options:
- Run the installation from Windows 10
- Open the created bootable flash drive and run Setup.exe
- Follow the on-screen instructions to update the system
Alternatively, you can boot from a USB drive and install Windows 11:
- In Windows 10, go to Settings, Update & security, Recovery
- In the Special boot options section, click "Restart now"
- After rebooting, choose to boot from a USB drive and follow the instructions
There is one caveat to booting: when the computer reboots for the first time, remove the USB drive from Windows 11, otherwise the process may freeze.
After installation, Windows 11 may activate automatically if you have a Windows 10 license. For example, a Windows 10 Pro key will automatically activate Windows 11 Pro without you having to enter the product.
If Rufus doesn't work for you, there are several other ways to install Windows 11 that bypass the TPM and CPU restrictions.
Changing the registry
Previously, Microsoft officially offered a way to bypass TPM verification by changing a registry key but then removed this information from the support page. However, this method still works.
- Open the Registry Editor on Windows 10
- Go to the HKEY_LOCAL_MACHINE\SYSTEM\Setup\MoSetup section
- Create a new registry key with the following parameters: Name: AllowUpgradesWithUnsupportedTPMOrCPU; Type: REG_DWORD; Value: 1
- Go to the official Microsoft website and find the Create Windows 11 Installation Media section
- Click Download Now to download the Media Creation Tool
- Run the Media Creation Tool and create a bootable USB drive with Windows 11
- Open the USB drive and run Setup.exe
Follow the on-screen instructions - Windows 11 should install without TPM verification.
It's worth noting that Microsoft may block this method in the future, but for now, it works.
Unattended Installer for Windows 11
This method lets you create custom Windows 11 installation media that automatically bypass TPM and CPU restrictions and configure your system to the settings of your choice.
- Go to the Unattend Generator website.
- In the Install Windows 11 Using These Language Settings section, select: Interface language, Keyboard layout, Country of residence
- Specify the processor architecture (x86, x64, or ARM64)
- If you're not sure, open Settings, System, and About on Windows 10 and check your system type
- In the Setup Settings section, select the options that allow you to bypass TPM verification
- Configure additional settings (automatic or manual disk partitioning, uninstalling pre-installed software, etc.)
- Click Download.xml file - the autounattend.xml file will be downloaded
- Create a bootable USB flash drive with Windows 11 using the Media Creation Tool (as in method 1)
- Copy the downloaded autounattend.xml to the flash drive
- Boot from the flash drive and follow the instructions - the installation will be automatic
This method not only bypasses the restrictions but also allows you to customize Windows 11 to your needs (for example, disable unnecessary applications and change the taskbar settings).
Remember that Windows 10 will stop receiving updates in 2025.