How to effectively manage subscriptions on iPhone without wasting money
 How to control iPhone subscriptions (photo: Unsplash)
On iPhone, it's easy to forget about subscriptions that automatically renew. However, there are several simple ways to control your subscriptions and avoid unnecessary expenses, reports Lifehacker.
Find and manage your subscriptions in the App Store
When you open the App Store, look for your Apple ID photo in the upper right corner. Click on it and the menu will open: Apps, Subscriptions, Purchase history and Notifications. Clicking on "Subscriptions" will take you to a page that displays all your subscriptions, including the name of the app, its icon, price, and the next automatic renewal date.
In the upper right corner, you can organize your subscriptions by name, price, or renewal date. Clicking on the name of the app will take you to a page with details and an option to cancel the subscription. If you choose to cancel, the page will refresh and show you how many days are left until your subscription expires.
By scrolling down the page, you can also see all your inactive subscriptions to reactivate them without having to open the apps or just check what you've paid in the past.
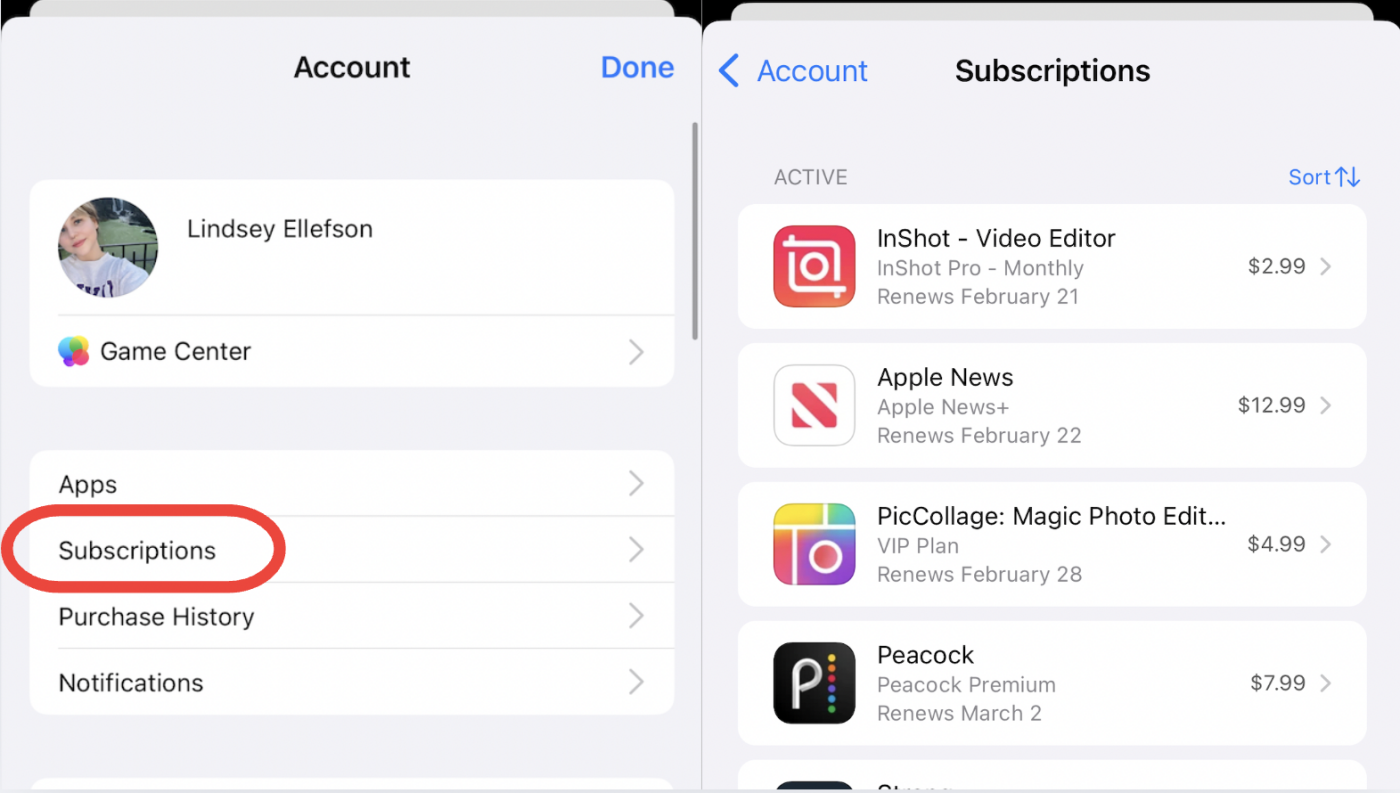
How to find subscriptions in the App Store (photo: Lifehacker)
Find and manage your subscriptions in Settings
Open Settings and click on your Apple ID at the top of the screen. Here you will see a list: "Personal information", "Login and security", "Payments and delivery" and "Subscriptions". Clicking on the latter will take you to the same page that you can access through the App Store, with a list of active and inactive subscriptions. Regardless of whether you access it through the App Store or settings, this page will be the same.
Things to keep in mind when managing subscriptions on iPhone
Keep in mind that these two methods only show subscriptions that you've purchased through the app itself, not those that were purchased through third-party sources and used through the app. These are the subscriptions that show up as "Apple.com" on your bank statement, so you'll need to review your charges to identify recurring payments from other sources. These subscriptions need to be canceled directly with their providers.
On the Subscriptions page, you can also turn on the option "Emails with renewal receipts". Scroll down the page, under active and inactive subscriptions, and make sure this option is enabled.
Then your subscription renewal receipts will be sent to the email associated with your Apple ID. This will help you keep track of what's being charged to your account and when, as emails contain more detailed information than bank statements. Each email will tell you which app took the money and how much was charged.
How to request a refund from Apple
If you accidentally purchased an app or renewed your subscription, you can always try to request a refund from Apple. Go to the App Store home page and find the Apps tab at the bottom of the screen. Scroll down until you reach the Quick Links section. At the bottom of the links you will see "Request a refund".
You are communicating directly with Apple, not with the app developer, which makes this process fairly straightforward. Clicking on the link will take you to a webpage that will list the following steps:
- Log in to reportaproblem.apple.com using your Apple ID
- Click "I'd like to," then select "Request a refund"
- Choose a reason for requesting a refund from the "Tell us more..." drop-down menu. Some reasons include: you didn't want to buy the app or the purchase was made by a child without your permission, but you can also select "other"
- Specify the app or subscription for which you want a refund and click "Submit".
You will receive the update upon your request in 24-48 hours. It may not work, but it's worth a shot.